

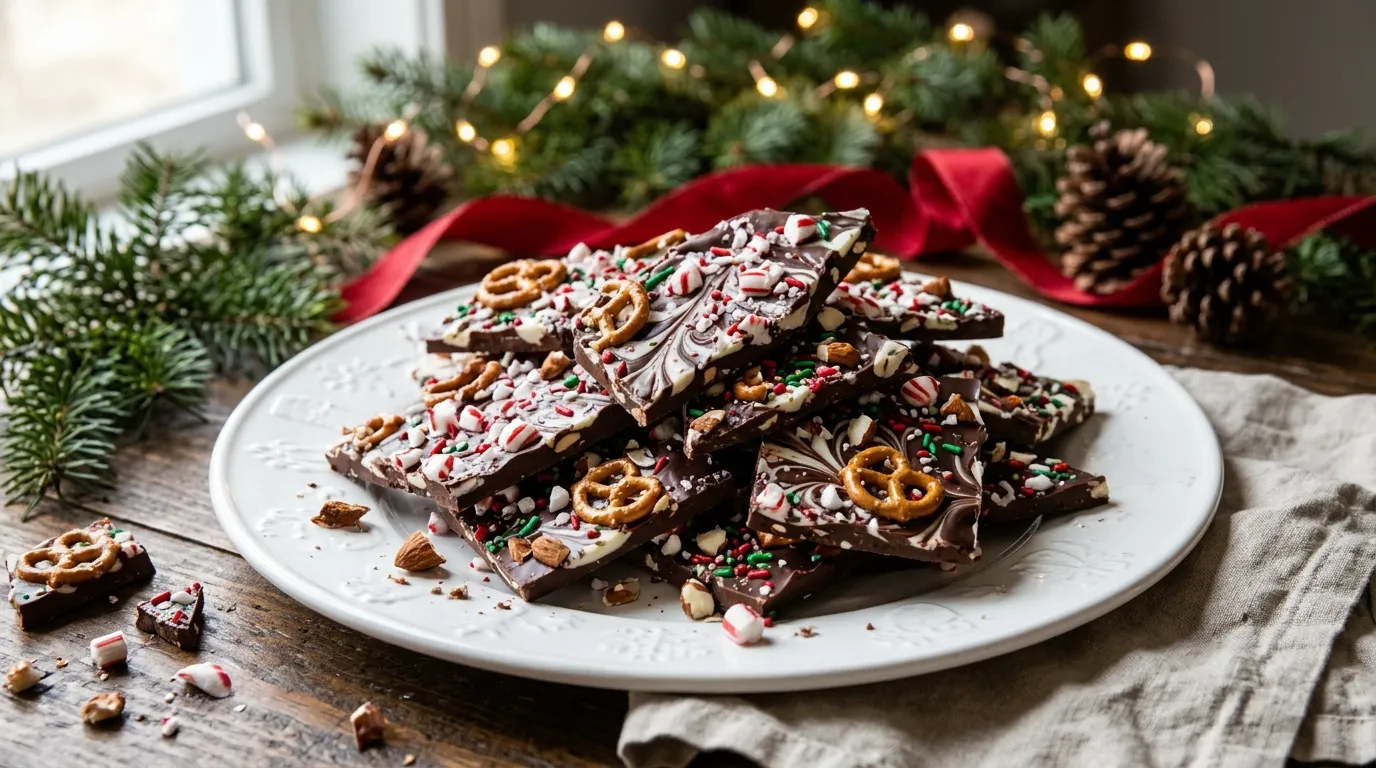
There is something special about making homemade candy during the Christmas season. The kitchen feels warmer, holiday music plays in the background, and the smell of melted chocolate makes everything feel a little more festive.
One of my favorite holiday traditions is preparing a big batch of Christmas candy to share with family and friends. I love recipes that look beautiful, taste delicious, and don’t require hours of work. That’s exactly why this Easy Christmas Candy Recipe has become such a favorite.
I remember one Christmas when I needed a last-minute homemade treat for a family gathering. I had chocolate, pretzels, some colorful holiday sprinkles, and a little peppermint candy in the pantry. Instead of making an elaborate dessert, I decided to combine everything into one simple candy bark.
The result was wonderful! The sweet chocolate, crunchy pretzels, refreshing peppermint, and festive decorations created a treat that looked like something from a holiday bakery.
Even better, everyone could help make it. The kids enjoyed sprinkling the toppings, while the adults happily sampled the chocolate before it even finished setting.
That’s what I love most about this recipe. It doesn’t require special candy-making equipment, complicated techniques, or expensive ingredients. You simply melt, decorate, chill, and break the candy into beautiful pieces.
Whether you’re preparing Christmas gifts, filling holiday treat bags, creating a dessert platter, or looking for something sweet to enjoy with hot cocoa, this homemade Christmas candy deserves a place on your holiday baking list.
And don’t worry if your candy pieces aren’t perfectly shaped. Those little imperfections make homemade treats feel even more special!
Why You’ll Love This Easy Christmas Candy Recipe

There are plenty of reasons to add this festive Christmas candy to your holiday recipe collection.
- Incredibly easy to make: You don’t need a candy thermometer, complicated instructions, or professional baking skills. If you can melt chocolate, you can make this recipe.
- Perfect for busy holidays: The preparation takes around 15 minutes, and the refrigerator does most of the remaining work.
- Budget-friendly ingredients: Chocolate, pretzels, peppermint candies, and sprinkles create a beautiful holiday treat without requiring an expensive shopping list.
- Beautiful homemade gifts: Package the candy in clear treat bags, decorative tins, or small gift boxes for thoughtful Christmas presents.
- Easy to customize: Change the chocolate, toppings, and decorations to create different flavors and colors.
Another reason I love this recipe is that it works wonderfully for holiday gatherings. You can make several batches with different toppings, arrange them on a large platter, and create an impressive dessert table without spending the entire day in the kitchen.
Ingredients for Easy Christmas Candy

Best Pretzel Peppermint Bark Recipe – How to Make Pretzel Peppermint Bark
The best part about this recipe is that most ingredients are easy to find at your local grocery store.
Here’s everything you’ll need to make a festive batch of homemade Christmas candy.
For the Chocolate Base
- 12 ounces semi-sweet chocolate chips: These provide a rich chocolate flavor without making the candy overly sweet. You can also use chopped semi-sweet chocolate bars.
- 8 ounces white chocolate chips: White chocolate creates a beautiful contrast against the darker chocolate and gives the candy a sweeter flavor.
- 1 teaspoon coconut oil: This helps the chocolate melt smoothly and creates a slightly thinner consistency for spreading. You can use vegetable shortening instead.
For the Festive Toppings
- ½ cup mini pretzels, roughly crushed: These add a satisfying salty crunch that balances the sweetness of the chocolate.
- ⅓ cup crushed peppermint candies: Peppermint adds a refreshing holiday flavor and makes the candy look wonderfully festive.
- ¼ cup red and green Christmas sprinkles: Choose your favorite holiday shapes, colors, or sugar decorations.
- ¼ cup chopped roasted almonds: These add extra crunch and a delicious nutty flavor. Leave them out if you prefer a nut-free version.
- 2 tablespoons mini chocolate candies: These add another pop of Christmas color and make each piece look cheerful.
Helpful Ingredient Notes
You don’t have to use every topping listed above. Think of the ingredients as a starting point for your own holiday candy creation.
For the best results, choose good-quality chocolate that melts smoothly. Chocolate chips work well, but chopped baking chocolate can also give you a lovely finish.
If you’re making this candy for a party, consider using both dark and white chocolate. The contrast makes the finished pieces look especially attractive.
Also, crush the peppermint candies into small pieces rather than large chunks. Big pieces can make the candy difficult to break and eat.
Step-by-Step Instructions for Homemade Christmas Candy
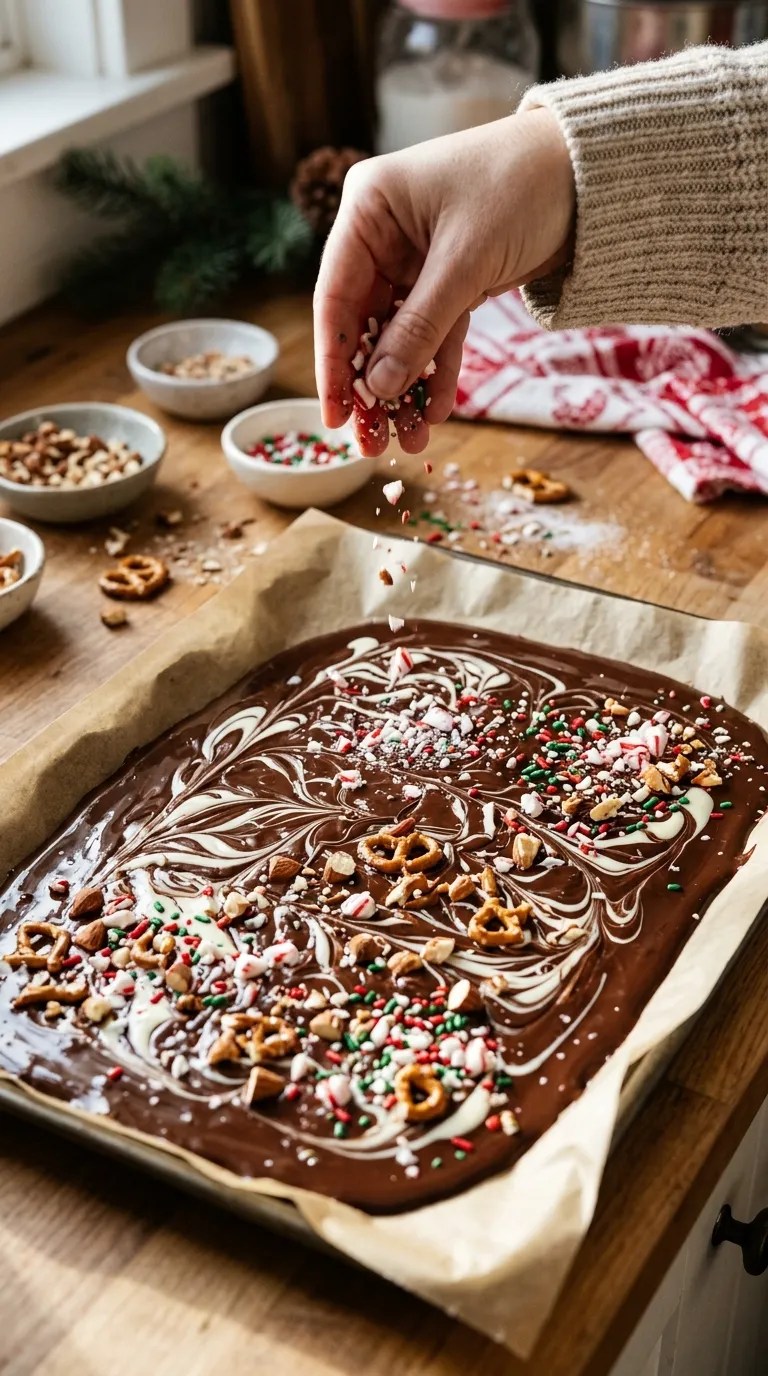
Use Your Favorite Chocolate Bars For Easy, Customizable Holiday Bark
Now comes the fun part! This recipe is simple enough for beginners, and you don’t need any special candy-making experience.
Before starting, gather your ingredients and prepare your workspace. Once the chocolate melts, you’ll want to work fairly quickly because it begins to set as it cools.
Step 1: Prepare Your Baking Sheet
Woman putting parchment paper in baking pan at white marble table, top view
Time: 3 minutes
Line a large rimmed baking sheet with parchment paper.
Make sure the parchment covers the bottom completely so the chocolate doesn’t stick to the pan.
If your parchment keeps curling at the edges, add a tiny dab of butter underneath each corner to hold it in place.
Set the prepared baking sheet aside while you melt the chocolate.
Step 2: Prepare the Toppings
Time: 5 minutes
Place the pretzels inside a zip-top bag and gently crush them with a rolling pin.
You want small pieces rather than fine crumbs. A little texture makes the finished candy more enjoyable.
Next, crush the peppermint candies. You can use a food processor with short pulses or place them inside a sealed bag and tap them gently with a rolling pin.
Measure the sprinkles, chopped almonds, and mini chocolate candies.
Keep everything close to your baking sheet. This makes decorating much easier once the chocolate is ready.
Step 3: Melt the Semi-Sweet Chocolate
How to Melt Chocolate in the Microwave – How to Melt Chocolate, According to Culinary Experts
Time: 2–3 minutes
Place the semi-sweet chocolate chips in a microwave-safe glass bowl.
Add ½ teaspoon coconut oil and stir gently.
Microwave the chocolate in 20-second intervals, stirring after each interval. Continue until most of the chocolate has melted.
Remove the bowl and stir until the remaining chocolate pieces disappear.
Be careful not to overheat the chocolate. Chocolate can burn surprisingly quickly, and even a small amount of moisture can make it turn thick and grainy.
If you prefer using a stovetop, place the chocolate in a heatproof bowl over a saucepan of gently simmering water. Make sure the bottom of the bowl doesn’t touch the water.
Step 4: Melt the White Chocolate
Time: 2–3 minutes
Place the white chocolate chips in a separate microwave-safe bowl.
Add the remaining ½ teaspoon coconut oil.
Microwave in 15–20-second intervals, stirring between each round until smooth.
White chocolate needs a little extra attention because it can overheat more easily than semi-sweet chocolate.
Once melted, set it aside.
If it begins to thicken while you’re working, give it a brief gentle stir. Avoid overheating it to loosen the mixture.
Step 5: Spread the Chocolate Base
Chocolate Bark Recipe (Easy and Homemade) – Fifteen Spatulas
Time: 3 minutes
Pour the melted semi-sweet chocolate onto your prepared baking sheet.
Use a silicone spatula or the back of a spoon to spread it into an even layer, approximately ¼ inch thick.
Don’t worry about making a perfect rectangle. Homemade chocolate bark looks lovely with slightly uneven edges.
Try to keep the thickness consistent so the candy sets evenly and breaks into manageable pieces.
Step 6: Add the White Chocolate Swirls
Time: 2 minutes
Drizzle the melted white chocolate over the semi-sweet chocolate.
You can create simple lines across the surface or add small spoonfuls of white chocolate in different places.
Take a toothpick or wooden skewer and gently drag it through the two chocolates to create a marbled pattern.
This little step makes the candy look beautiful without requiring any decorating experience.
One thing I’ve learned is not to overdo the swirling. A few gentle movements create a much prettier pattern than mixing the two chocolates completely.
Step 7: Decorate with Christmas Toppings
Time: 3–4 minutes
While the chocolate is still soft, sprinkle the crushed pretzels, peppermint candies, chopped almonds, and Christmas sprinkles over the surface.
Distribute the toppings evenly so every piece gets a little bit of everything.
Gently press larger toppings into the chocolate with clean fingertips or the back of a spoon.
This helps them stay attached once the candy hardens.
For a particularly festive finish, add a few extra red and green sprinkles near the edges.
Step 8: Chill Until Firm
Time: 45–60 minutes
Carefully transfer the baking sheet to the refrigerator.
Let the candy chill for approximately 45–60 minutes, or until the chocolate feels completely firm.
Avoid covering the candy while it remains warm. Trapped moisture can affect the chocolate’s appearance and texture.
You’ll know it’s ready when the chocolate feels solid and releases easily from the parchment paper.
Step 9: Break into Pieces and Serve
Creamy Peppermint Chocolate Holiday Treat
Time: 3 minutes
Remove the baking sheet from the refrigerator.
Lift the parchment paper and transfer the chocolate slab to a clean cutting board.
Use your hands or a sharp knife to break the candy into bite-sized pieces.
I personally prefer irregular pieces because they have that classic homemade chocolate bark appearance.
Arrange the finished Christmas candy on a serving platter or place it in decorative containers.
Your festive homemade treat is ready!
Pro Tips and Tricks for Perfect Christmas Candy

Even though this recipe is simple, a few small details can make a big difference in the final result.
These are the tips I’d share with a friend making Christmas candy for the first time.
1. Never Rush the Chocolate-Melting Process
The biggest mistake people make when melting chocolate is using too much heat.
Chocolate doesn’t need high temperatures to melt. Short microwave intervals and frequent stirring work much better.
Remember that residual heat continues melting chocolate even after you remove the bowl from the microwave.
Stop heating when a few small pieces remain, then stir until everything becomes smooth.
2. Keep Water Away from the Chocolate
Water and melted chocolate don’t always get along.
Even a few drops of water can cause melted chocolate to seize and become thick or grainy.
Make sure your bowls, spatulas, and spoons are completely dry before starting.
If you’re using the double-boiler method, prevent steam or condensation from entering the chocolate.
3. Add Toppings Before the Chocolate Sets
This is especially important when working with pretzels, peppermint pieces, and larger decorations.
If you wait too long, the chocolate may harden before the toppings stick.
I recommend decorating immediately after spreading and swirling the chocolate.
4. Don’t Make the Chocolate Layer Too Thick
A thick chocolate slab can become difficult to break and eat.
Aim for approximately ¼ inch thickness. This gives you sturdy pieces without making them uncomfortably large.
If you prefer thinner candy, spread the chocolate slightly more. Just remember that thinner pieces may break more easily.
5. Store the Candy Properly
Once the chocolate has completely hardened, place the pieces in an airtight container.
Separate layers with parchment paper to prevent the toppings from scratching or sticking to neighboring pieces.
Keep the container in a cool, dry place away from direct sunlight and warm appliances.
For warmer kitchens, refrigeration offers a more reliable storage option.
Variations and Substitutions
“Festive Flavors of Christmas: Celebratory Dishes for the Perfect Holiday”
Dark Chocolate Peppermint Bark Recipe – Sunset Magazine
11
One of my favorite things about homemade Christmas candy is how easily you can change the flavors.
Once you understand the basic method, you can experiment with different chocolates and toppings to create something that suits your family.
Here are a few delicious ideas.
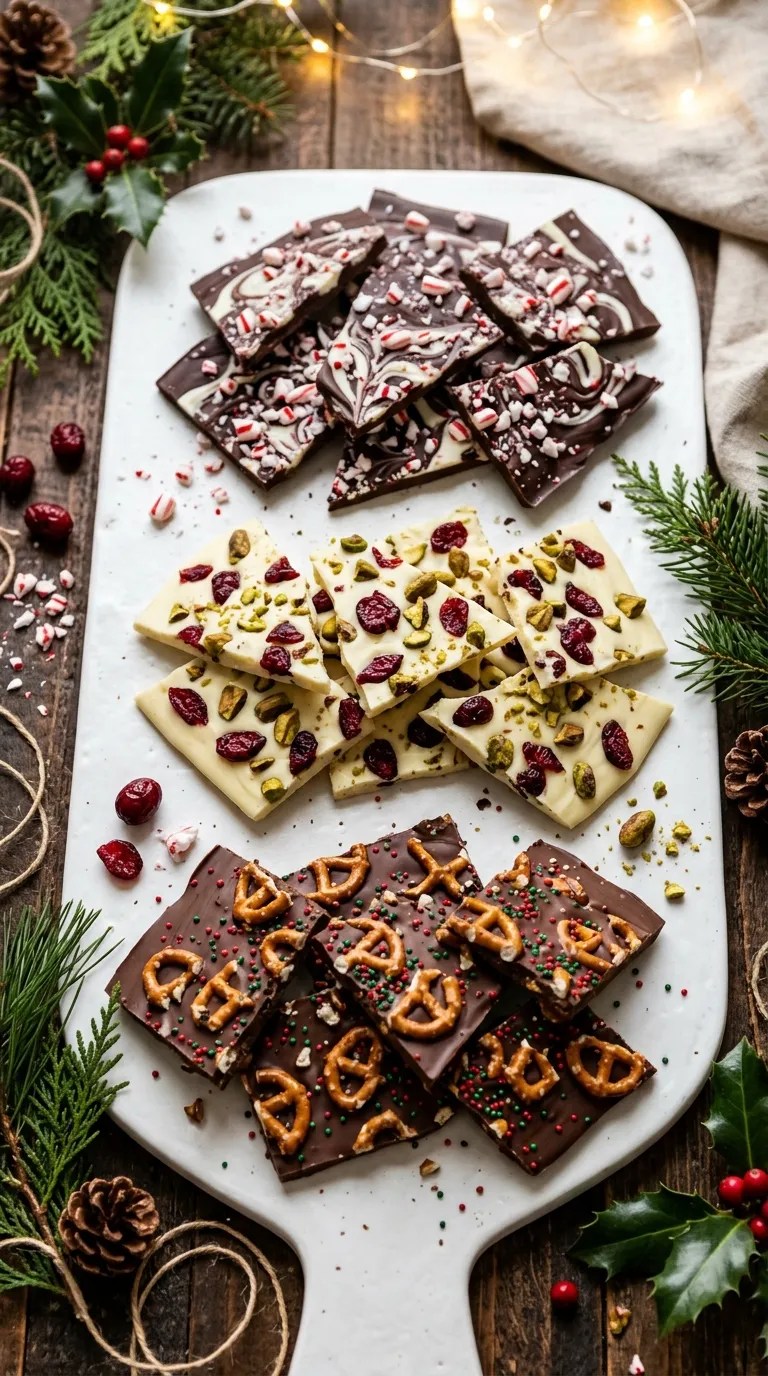
White Chocolate Cranberry Christmas Candy
If you enjoy sweeter candy with a little fruity flavor, try replacing the semi-sweet chocolate base with white chocolate.
Add:
- 12 ounces white chocolate.
- ¼ cup dried cranberries.
- ¼ cup chopped pistachios.
- 2 tablespoons festive sprinkles.
Spread the melted white chocolate over parchment paper and scatter the toppings across the surface.
The red cranberries and green pistachios create a beautiful holiday color combination.
Dark Chocolate Peppermint Candy
For people who prefer less-sweet desserts, dark chocolate makes a wonderful alternative.
Use 12 ounces of dark chocolate and top it with crushed peppermint candies and a small handful of chopped roasted almonds.
The slightly bitter chocolate balances the sweetness of the peppermint.
This variation also looks beautiful wrapped in small clear gift bags with red ribbon.
Nut-Free Christmas Candy
If you’re preparing treats for a gathering where guests may have nut allergies, simply leave out the almonds.
Replace them with extra pretzels, mini chocolate candies, or additional peppermint pieces.
Remember that chocolate and other packaged toppings may carry allergen warnings or cross-contact information. Check the labels carefully, especially when preparing food for someone with a serious allergy.
Dairy-Free Christmas Candy
You can also make a dairy-free version by choosing certified dairy-free chocolate and suitable dairy-free toppings.
Check every ingredient label rather than assuming that dark chocolate or peppermint candy contains no dairy.
Follow the same preparation method, using chocolate products that melt smoothly.
Serving Suggestions for Festive Holiday Treats

Once your Christmas candy has set, there are so many fun ways to serve and share it.
You don’t need an elaborate dessert table to make these little treats feel special.
Here are some of my favorite ideas.
Add It to a Christmas Dessert Platter
Arrange the chocolate bark alongside sugar cookies, gingerbread cookies, shortbread, and other homemade treats.
Use a large white serving platter to make the red, green, and chocolate colors stand out.
For a more festive presentation, add a few fresh-looking holiday decorations around the platter, keeping non-food decorations separate from the candy.
Serve It with Hot Chocolate
Christmas candy and hot chocolate make a wonderful winter combination.
Serve a few pieces alongside mugs of warm cocoa topped with whipped cream or marshmallows.
The combination of creamy chocolate and crunchy peppermint candy feels especially cozy on a chilly evening.
Make Homemade Christmas Gifts
This recipe works beautifully as an edible holiday gift.
Place the candy pieces inside:
- Clear cellophane treat bags.
- Small Christmas cookie tins.
- Decorative paper gift boxes.
- Glass jars with festive ribbon.
Add a small handwritten label with the candy name and preparation date.
If you’re gifting the candy, include an ingredient and allergen note so recipients know what’s inside.
Pack Holiday Treat Bags
These candies are also lovely additions to holiday treat bags.
Combine a few pieces with homemade cookies or individually wrapped chocolates.
They’re suitable for family gatherings, school celebrations, office parties, and neighborhood gift exchanges. For events with food restrictions, check the organizer’s rules and label ingredients clearly.
Create a Christmas Movie Snack Tray
For a relaxed holiday movie night, arrange the candy with popcorn, pretzels, cookies, and fruit.
Everyone can pick their favorite snack while enjoying a Christmas movie.
It’s a simple way to make an ordinary evening feel festive.
Related Recipes:
- Christmas Dinner Recipe – Easy Holiday Favorite
- Christmas Baking Recipe – Easy Holiday Favorite
- Christmas Cookie Recipe – Easy Holiday Treat
- Christmas Candy Recipe – Easy Holiday Treat
FAQ’s
Here are answers to some common questions about making, storing, and serving homemade Christmas candy.
How long does homemade Christmas candy last?
When stored in an airtight container in a cool, dry place, this chocolate bark generally keeps its best quality for about 1–2 weeks.
If your kitchen gets warm, refrigerate it instead.
Always check the candy before serving. Discard it if you notice unusual odors, moisture damage, or other signs of spoilage.
Can I make Christmas candy ahead of time?
Absolutely!
This recipe works well for holiday preparation because you can make it several days before Christmas.
Prepare the candy, allow it to set completely, and store the pieces in an airtight container.
Keep the container in a cool location away from sunlight and heat.
For the best appearance, avoid handling the chocolate more than necessary.
Can I freeze homemade Christmas chocolate bark?
Yes, you can freeze chocolate bark, although the texture and appearance may change slightly after thawing.
Place the completely hardened pieces in a freezer-safe airtight container with parchment paper between the layers.
Freeze for up to 2 months for best quality.
When you’re ready to serve, transfer the container to the refrigerator and allow it to thaw gradually while still closed. This helps reduce condensation on the chocolate.
Why did my melted chocolate become thick and grainy?
Chocolate usually becomes thick and grainy when it overheats or comes into contact with moisture.
Always use dry utensils and melt chocolate slowly.
If you use a microwave, stir every 15–20 seconds rather than heating it continuously.
Also, remember that white chocolate melts more easily than many darker chocolates, so keep a close eye on it.
Can I make this Christmas candy without peppermint?
Of course!
Peppermint is completely optional.
You can replace it with dried cranberries, crushed pretzels, chopped toasted coconut, or extra Christmas sprinkles.
If you prefer a candy with no mint flavor, simply leave out the peppermint and use your favorite toppings instead.
Do I need a candy thermometer for this recipe?
No. You don’t need a candy thermometer because this recipe uses melted chocolate rather than cooked sugar or traditional hard-candy mixtures.
A microwave-safe bowl, spatula, baking sheet, and refrigerator are enough.
If you want a glossy chocolate finish with a firm snap at room temperature, you can use properly tempered chocolate. However, tempering requires more precise temperature control and isn’t necessary for this simple refrigerated version.
Can I use a double boiler instead of a microwave?
Yes!
A double boiler works very well for melting chocolate.
Place a heatproof bowl over a saucepan containing gently simmering water. Keep the bowl above the water rather than letting it touch the surface.
Stir the chocolate slowly until smooth, then remove the bowl carefully.
Make sure no steam or water enters the chocolate.
How do I stop the toppings from falling off?
The secret is to add your toppings while the chocolate is still soft.
Sprinkle everything over the chocolate immediately after spreading and swirling.
For larger pieces, gently press them into the surface so they make good contact with the melted chocolate.
Don’t wait until the chocolate begins to harden.
Final Thought
Christmas baking doesn’t always have to involve complicated recipes, long ingredient lists, or hours spent in the kitchen.
Sometimes the simplest treats become the ones everyone remembers.
That’s why I love this Easy Christmas Candy Recipe. It brings together creamy chocolate, crunchy pretzels, refreshing peppermint, and colorful holiday decorations in a treat that looks beautiful and tastes even better.
It’s also a wonderful recipe to make with family. Let everyone choose their favorite toppings, create their own chocolate combinations, and help decorate the baking sheet.
No two batches have to look exactly alike.
Whether you prepare it for a Christmas party, package it as a homemade gift, or keep a container nearby for holiday snacking, this festive candy is an easy way to add something sweet to the season.
My biggest advice? Make a little extra. These pieces have a funny way of disappearing whenever someone walks through the kitchen!
If you try this recipe, I’d love to hear how it turns out. Did you use peppermint, cranberries, pretzels, or your own favorite topping combination?
Share your ideas and let other readers know how you made this Christmas candy your own.
Leave a Reply
You must be logged in to post a comment.